Café culture is more than a latte and a laptop—it’s a global ritual built around flavor, craft, and connection. Whether you’re lingering over a pour-over at your neighborhood spot or dialing in espresso at home, you’re part of a living tradition shaped by farmers, roasters, baristas, and enthusiasts. This guide walks you through the core of that culture: how to choose beans, brew them well, taste thoughtfully, and pick the right tools to elevate your daily cup.
What “Café Culture” Really Means Today
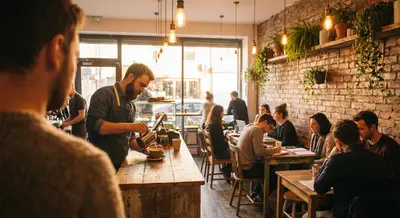
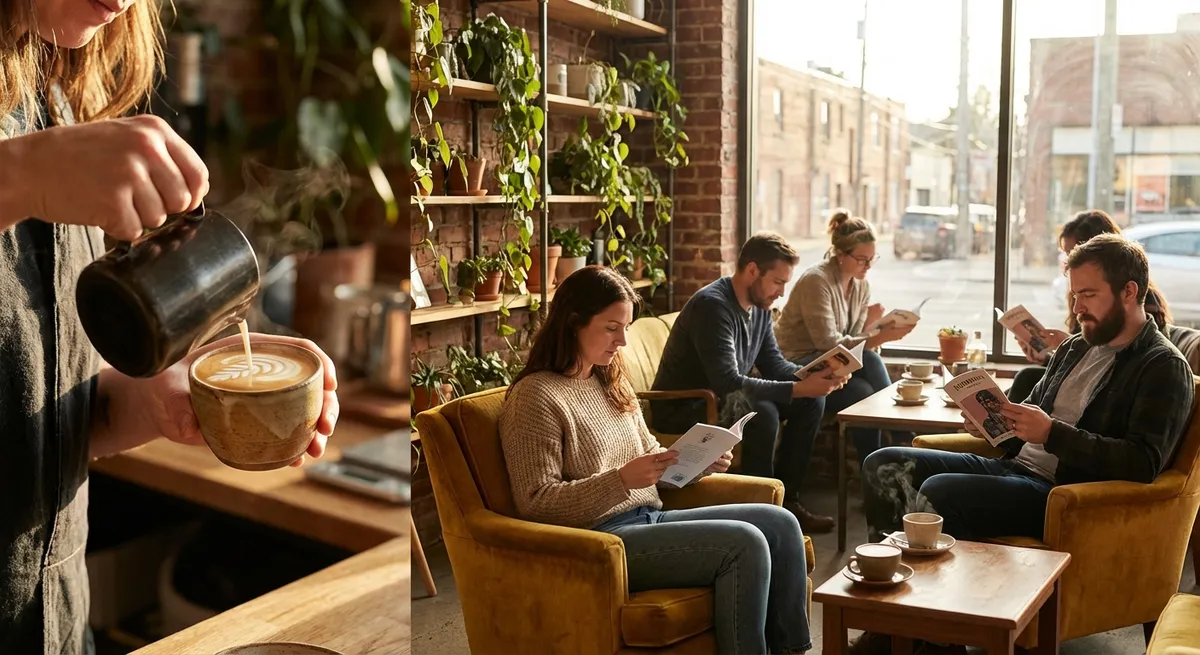
Café culture has evolved far beyond simple caffeine delivery. The modern café is a crossroads where agriculture, design, technology, and community meet. On one side, you have coffee farmers experimenting with new processing methods; on the other, baristas pulling precisely timed shots while playlists and pastries set the mood.
Third-wave coffee shops emphasize transparency—sharing details about the farm, altitude, processing method, and roast profile. Menus feature tasting notes like “stone fruit, bergamot, and cocoa nib,” inviting you to treat coffee like wine rather than a background beverage. Many cafés now host cuppings (coffee tastings), latte art throwdowns, and educational workshops, turning guests into participants rather than just customers.
At its heart, café culture is about hospitality and storytelling: each cup is a glimpse into a specific place, variety, and craft. Learning a bit of the language—what “washed” means, why baristas obsess over grind size—helps you feel at home in any coffee bar, and lets you recreate that experience in your kitchen.
Picking the Right Beans: Origin, Roast, and Processing
Choosing beans is the single most important step in your coffee journey. Good technique can’t rescue poor-quality beans, but even basic gear can shine with a great roast.
1. Origins and Flavor Profiles
Different coffee-growing regions tend to show distinct flavor patterns (there are always exceptions, but these are helpful starting points):
- Ethiopia: Often floral and fruity; notes of jasmine, bergamot, blueberry, or stone fruit. Great for pour-over and filter brewing.
- Kenya: Bright, juicy acidity; blackcurrant, grapefruit, tomato-like savoriness; very vibrant in pour-over or batch brew.
- Central America (Guatemala, Costa Rica, Honduras, etc.): Balanced, nutty, chocolatey with gentle fruit; very approachable and versatile.
- South America (Brazil, Colombia): Brazil often leans chocolate, nuts, low acidity. Colombia can range wildly but frequently offers caramel sweetness and mild fruit.
- Asia-Pacific (Sumatra, Papua New Guinea, etc.): Often earthy, spicy, herbal, with heavier body; great for those who prefer rich, dark profiles.
Ask yourself: do you enjoy bright, fruit-forward cups, or richer, chocolate-and-nut flavors? Use that as your compass.
2. Roast Level
Roast level affects how much you taste the bean’s origin vs. the roast itself.
- Light Roast: Higher acidity, more aromatics; highlights origin character. Ideal for filter coffee and for those who like nuanced flavors.
- Medium Roast: Balanced; more body and sweetness while retaining some origin notes. Very versatile for both filter and espresso.
- Dark Roast: More roast-driven notes (smoke, bitter chocolate, carbon); lower perceived acidity. Works well for strong milk drinks but can mask delicate origin flavors.
For exploring café-style flavor at home, try light-to-medium roasts from quality roasters before venturing darker.
3. Processing Methods
Processing is how the fruit is removed from the seed (bean) after harvest, and it dramatically shapes flavor:
- Washed (Wet Process): Fruit is removed before drying. Often cleaner, brighter, and more transparent in flavor.
- Natural (Dry Process): Cherries are dried whole, then hulled. Often fruitier, winey, sometimes funky, with heavier body.
- Honey / Pulped Natural: Some fruit mucilage is left on during drying. Typically sweeter and rounder; a middle ground between washed and natural.
For a gentle introduction, start with washed coffees, then branch into natural and honey-processed beans once you’re comfortable spotting differences.
4. Freshness and Storage
- Buy whole beans, not pre-ground, and use them within 2–4 weeks of roast date for best flavor.
- Store in an airtight, opaque container away from heat, light, and moisture.
- Avoid the fridge or freezer for opened bags; temperature swings introduce condensation.
If your café or roaster lists roast dates, tasting notes, and origin details, that’s a promising sign of quality and transparency.
Essential Home Brewing Gear: What Actually Matters
You don’t need a café’s budget to brew well at home, but a few key pieces of gear will dramatically improve consistency and flavor.
1. Grinder: Your Most Important Investment
A burr grinder is non-negotiable for quality.
- Why burr over blade? Burrs crush beans to a uniform size; blades chop unevenly, causing over- and under-extraction in the same cup.
- Manual burr grinders: Great value if you brew 1–2 cups at a time and don’t mind a 30–60-second arm workout.
- Electric burr grinders: Better for convenience and larger batches; look for models with settings for espresso and filter if you want flexibility.
2. Kettle and Scale
- Gooseneck kettle: Gives you precise control over pour rate and placement, crucial for pour-over methods.
- Digital scale (0.1 g resolution): Ensures consistent coffee-to-water ratios. Once you start weighing, you’ll wonder how you ever brewed without it.
3. Brewers: Choose Your Style
Popular manual brewers each have a “personality”:
- Hario V60: Clean, bright, expressive; ideal for exploring nuanced single-origin coffees.
- Kalita Wave: Flatter bed and smaller drain holes for more forgiving extractions; great for consistency.
- French Press: Full-bodied, rich, with natural oils; less clarity but lots of texture.
- AeroPress: Versatile, compact, travel-friendly; can mimic espresso-like concentration or cleaner filter coffee.
- Moka Pot: Stovetop “espresso-style” coffee; intense and great for milk drinks, though not true espresso.
Start with one method that fits your lifestyle—then expand once you understand what you like.
Step-by-Step: Brewing a Café-Quality Pour-Over at Home
This guide uses a V60-style cone, but the principles apply to similar brewers.
What You’ll Need
- Fresh, whole-bean coffee
- Burr grinder
- V60 (or similar dripper) + filter
- Gooseneck kettle
- Digital scale + timer
- Mug or carafe
Recommended Recipe (Single Cup)
- Coffee: 15 g
- Water: 250 g (about 1:16–1:17 coffee-to-water ratio)
- Water temp: 92–96°C (197–205°F)
- Grind: Medium-fine (similar to table salt)
Step 1: Heat and Rinse
- Heat water to 92–96°C.
- Place the filter in the dripper and rinse thoroughly with hot water.
- Discard rinse water and set the dripper on your mug or server.
Rinsing removes papery flavors and preheats your brewer.
Step 2: Weigh and Grind
- Weigh 15 g of coffee beans.
- Grind to a medium-fine setting—finer than drip machine, coarser than espresso.
If your brew tastes sour and thin, try grinding a bit finer. If it tastes bitter and harsh, go slightly coarser.
Step 3: The Bloom
- Add ground coffee to the filter, level the bed, and tare your scale.
- Start your timer and pour about 45–50 g of hot water (3x the coffee weight), saturating all grounds.
- Gently swirl or stir to ensure no dry pockets.
- Let it bloom for 30–45 seconds.
This step releases trapped CO₂ so extraction can proceed evenly.
Step 4: Main Pour
- At ~0:30–0:45, begin pouring slowly in gentle circles, avoiding the filter walls.
- Pour up to 150 g of total water by about 1:15.
- Continue pouring in stages or a smooth continuous stream until you reach 250 g total between 2:00–2:15.
- You can give a gentle swirl to settle the bed.
Aim for a total brew time around 2:30–3:00 once the water fully drains.
Step 5: Taste and Adjust
Taste your coffee black before adding anything:
- Too sour/underdeveloped: Try a finer grind, slightly hotter water, or a bit more contact time.
- Too bitter/astringent: Try a coarser grind, slightly cooler water, or a bit less contact time.
- Flat or dull: Slightly increase dose (e.g., 16 g) or tighten your pour pattern for better extraction.
Treat each brew as a small experiment and note what you change.
Step-by-Step: Simple French Press for Full-Bodied Comfort
French press shines when you want something cozy, chocolatey, and forgiving.
Quick Recipe (2 Large Cups)
- Coffee: 30 g
- Water: 500 g at ~94°C (201°F)
- Grind: Coarse, like sea salt
Steps
- Add ground coffee to the press.
- Start your timer and pour all 500 g of water, saturating evenly.
- Give a gentle stir to break up clumps.
- Place the lid on top (plunger pulled up) and steep for 4 minutes.
- At 4:00, stir gently again, scoop off the crusty foam on top if you prefer cleaner cups.
- Slowly press the plunger down.
- Decant immediately into cups or a server to prevent over-extraction.
Expect a heavier body and some fine sediment—part of the charm of French press.
Espresso at Home: Expectations and Essentials
Espresso is the high-wire act of coffee brewing: small changes produce big differences, and the equipment bar is higher.
Key Realities
- You need a good grinder capable of fine, precise adjustment.
- A reliable espresso machine must deliver stable temperature and pressure.
- Fresh, espresso-appropriate beans (usually medium roast, roasted within 2–4 weeks) are essential.
Basic Espresso Parameters
- Dose: 18–20 g of finely ground coffee (for a double shot)
- Yield: 36–40 g of liquid espresso
- Time: ~25–30 seconds from pump start
If your shot gushes out in <20 seconds, grind finer. If it barely drips for 35+ seconds, grind coarser.
For café-style milk drinks (lattes, cappuccinos), a machine with a proper steam wand and a pitcher is needed to make glossy microfoam. There’s a learning curve, but it’s deeply rewarding once you nail it.
How to Taste Coffee Like a Pro (Without the Snobbery)
Tasting doesn’t have to be pretentious. Think of it as paying attention on purpose.
1. Start with the Basics
Take a sip and focus on four things:
- Aroma: What do you smell—chocolate, nuts, fruit, florals, spices?
- Acidity: Is it bright and sparkling, soft and mellow, or muted?
- Body: Light and tea-like, medium and silky, or heavy and syrupy?
- Finish: What lingers—sweetness, bitterness, a specific flavor?
2. Use Simple Language First
Instead of hunting for exotic descriptors, start broad:
- Chocolatey / nutty / caramel
- Fruity (red berries, citrus, stone fruit)
- Floral (jasmine, rose)
- Spicy / earthy / herbal
Over time you can refine: “red fruit” might become “raspberry” or “cherry” as your palate calibrates.
3. Compare Side by Side
The fastest way to learn is to taste two very different coffees at once:
- A washed Ethiopian vs. a natural Brazilian
- A light roast vs. a dark roast of similar origin
Brew them with the same method and ratio, then alternate sips. Differences pop much more clearly in comparison.
4. Temperature Matters
Flavors change as coffee cools:
- Hot: More aromatics but can hide acidity and subtle sweetness.
- Warm: Sweetness and complexity are easiest to assess here.
- Cool: Acidity and defects show more clearly.
Try tasting your coffee at different temperatures before reaching for the sugar.
Equipment Recommendations by Budget and Brew Style
These are general categories rather than specific models (which change frequently), but the guidelines hold.
Entry-Level Essentials
Perfect if you’re just starting:
- Manual burr grinder (trustworthy budget brands or hand grinders)
- Pour-over kit (V60 or Kalita, filters, and a simple kettle)
- Digital scale (even a basic kitchen scale beats eyeballing)
- French press or AeroPress for an easy, flexible option
Intermediate: Hobbyist Home Barista
For those brewing daily and exploring more origins:
- Electric burr grinder with reliable grind consistency
- Gooseneck kettle with temperature control
- Multiple brewers: V60 + Kalita + AeroPress, for experimentation
- Quality insulated server to keep brews stable and warm
Advanced: Espresso & Beyond
If you’re ready to invest:
- Prosumer espresso machine with PID temperature control and good steaming
- High-end grinder capable of fine espresso adjustment
- Water filtration or remineralization system tailored for coffee
- Refractometer and tools (for those who want to measure extraction scientifically)
No matter your budget, focus on grinder quality, fresh beans, and consistent technique. That’s where most of the magic lives.
Bringing Café Culture Home (And Sharing It)
Part of the joy of café culture is sharing it—both in person and online.
- Host casual coffee mornings with friends: brew one origin two different ways and compare.
- Share your brew recipes and tasting notes on social media; tag roasters and cafés you love to support their work.
- Visit local cafés, talk to baristas, and ask about their current favorite beans or methods—then try recreating them at home.
- Keep a simple coffee journal: date, bean, brew method, ratio, grind setting, and a few flavor notes. It’s surprisingly fun to look back and see your palate evolve.
As you build your own rituals—morning pour-overs, afternoon espresso breaks—you’re not just making coffee. You’re participating in a global culture that values patience, craft, and connection, one cup at a time.
Conclusion
From choosing a washed Ethiopian light roast to dialing in your French press, every step in making coffee is an opportunity to slow down and taste more of the world. Café culture thrives because it combines sensory pleasure with human stories—of farmers, roasters, baristas, and everyday drinkers.
With a handful of well-chosen tools, a basic grasp of brewing fundamentals, and a curious palate, your kitchen can become your favorite café. Experiment, take notes, share your discoveries, and let each cup move you a little closer to the flavors and rituals you love most.
Sources
- [Specialty Coffee Association (SCA) – Brewing Best Practices](https://sca.coffee/education/brewing) - Professional standards and guidelines for brewing, extraction, and water quality
- [Counter Culture Coffee – Coffee Basics & Brewing Guides](https://counterculturecoffee.com/learn/education) - Accessible education on origin, processing, tasting, and home brewing methods
- [Stumptown Coffee Roasters – Brew Guides](https://www.stumptowncoffee.com/pages/brew-guides) - Step-by-step instructions and recipes for popular brewing devices
- [National Coffee Association (NCA) – Coffee Roasts & Flavor](https://www.ncausa.org/About-Coffee/Coffee-Roasts-Guide) - Overview of roast levels and how they affect flavor profiles
- [Perfect Daily Grind – Coffee Processing Methods Explained](https://perfectdailygrind.com/2020/01/a-beginners-guide-to-coffee-processing/) - Detailed breakdown of washed, natural, honey, and other processing styles and their impact on taste
Key Takeaway
The most important thing to remember from this article is that this information can change how you think about Cafe Culture.