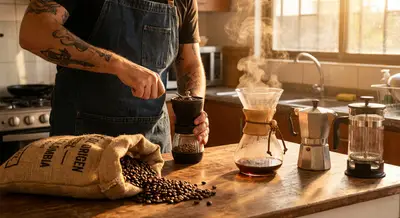
There’s a moment, right before your first sip, when the world goes quiet. The aroma lifts, the cup warms your hands, and suddenly coffee isn’t just a drink—it’s a daily ritual. At RoastEden, we live for that moment. Brewing method, beans, and technique all shape how that moment tastes and feels. This guide walks you through the most-loved brewing methods, how to choose the right beans, and how to dial in your coffee so every cup feels intentional, not accidental.
Understanding the Foundations: Beans, Grind & Water
Before we talk gear, we have to talk fundamentals. The best brewing method in the world can’t rescue bad beans, bad water, or the wrong grind.
Freshness is your starting point. Buy whole beans if you can, and aim to use them within 2–4 weeks of the roast date. Store them in an airtight, opaque container at room temperature—no fridge, no freezer cycling (condensation can damage flavor).
Grind size is the second pillar. It controls extraction: the process of dissolving desirable flavors from ground coffee into water. Too fine and the coffee over-extracts, tasting bitter and harsh. Too coarse and it under-extracts, tasting sour, weak, or “hollow.” Each brew method has a grind “zone” where it shines, which we’ll cover in detail below.
Water is the quiet hero of every cup. Since coffee is mostly water, using filtered water (or at least good-tasting tap water) makes a noticeable difference. As a rule of thumb, if you wouldn’t drink your water plain, you probably don’t want to brew with it. Ideal brewing temperature for most methods is about 195–205°F (90–96°C)—just off a rolling boil.
Finally, ratio matters. A widely accepted starting point is about 1:15–1:17 coffee to water by weight. That’s 1 gram of coffee for every 15–17 grams (or milliliters) of water. From there, you can adjust stronger or milder to taste.
Matching Beans to Brewing Methods
Different brew methods bring out different sides of a coffee’s personality, and bean selection can make your favorite method truly sing.
Light roasts tend to highlight acidity, florals, and fruit notes—think Ethiopian beans with citrus and berry, or Kenyan with blackcurrant and wine-like brightness. These often shine in pour-over methods and Aeropress, where clarity and nuance are front and center.
Medium roasts sit in a sweet spot for many drinkers, balancing sweetness, body, and acidity. They’re versatile and do well in drip machines, pour-overs, and French press. You might taste chocolate, nuts, caramel, and subtle fruit.
Dark roasts emphasize body, roast character, and smokier, more intense flavors. They stand up beautifully in espresso and moka pots, and pair well with milk. Expect dark chocolate, toasted nuts, spice, and sometimes a touch of smokiness.
Origin also matters. African coffees often bring fruit and floral notes; Central and South American coffees can lean nutty, chocolatey, and balanced; Asian coffees (like many from Sumatra) often bring earthy, spicy, or herbal tones with deep body.
A simple pairing guide:
- Manual Pour-Over (V60, Kalita): Light to medium roasts, washed-process beans, complex origins (Ethiopia, Kenya, Colombia)
- French Press: Medium to medium-dark roasts, chocolatey or nutty profiles (Brazil, Guatemala)
- Espresso: Medium-dark to dark, blends designed for consistency and body
- Cold Brew: Medium or dark roasts with rich chocolate and caramel notes
- Moka Pot: Medium-dark Italian-style blends or robust single origins that handle intensity
Hand-Pour Magic: V60 & Kalita Step-by-Step
Pour-over is the method for people who love control and clarity in the cup. It highlights subtle flavors and gives you a clean, tea-like body.
Recommended Gear
- Dripper (Hario V60, Kalita Wave, or similar)
- Paper filters matched to your dripper
- Gooseneck kettle (for precision pouring)
- Burr grinder
- Digital scale
- Timer
- Fresh, whole-bean coffee
Basic V60 Recipe (1 Cup)
- Coffee: 15 g (medium-fine grind, like table salt)
- Water: 240–255 g at ~200°F (93°C)
- Ratio: About 1:16–1:17
- Total time: 2:30–3:00 minutes
Step-by-Step
Heat & Rinse:
Heat water to near boiling. Place the filter in the dripper and rinse thoroughly with hot water to remove paper taste and preheat the brewer. Discard rinse water.
Add Coffee & Bloom:
Add 15 g of ground coffee and gently shake to level. Start your timer and pour about 30–40 g of water, fully wetting the grounds. Let it “bloom” for 30–45 seconds. This releases trapped gas and improves even extraction.
Main Pour:
After the bloom, pour in slow, controlled circles, keeping the water level steady and avoiding the filter walls as much as possible. Aim to reach your total water weight (240–255 g) by around 1:45–2:00 minutes.
Let It Draw Down:
Allow the water to drain completely. The final drip should land around 2:30–3:00 minutes. If it’s much faster, use a finer grind next time; if much slower, coarsen the grind.
Taste & Adjust:
Take a sip when it’s warm, not scalding. If it tastes sour or thin, you may need a finer grind or slightly more coffee. If it tastes bitter or harsh, try a coarser grind or slightly less coffee.
Tasting Notes to Look For
- Light roast Ethiopian: jasmine, bergamot, lemon, blueberry
- Washed Colombian: red apple, caramel, cocoa
- Guatemalan: milk chocolate, almond, subtle citrus
Pour-over is where you can really explore origin differences—brew the same recipe with different beans and note how dramatically the flavors shift.
French Press: Comfort in a Cup
French press (or cafetière) is immersion brewing: grounds steep in hot water, giving a rich, full-bodied cup with more oils and texture. It’s forgiving, low-tech, and perfect for “coffee with a book” moments.
Recommended Gear
- French press (12–34 oz capacity)
- Burr grinder
- Kettle
- Scale (optional but helpful)
- Timer
Classic French Press Recipe (2 Cups)
- Coffee: 30 g (coarse grind, like sea salt)
- Water: 500 g at ~200°F (93°C)
- Ratio: 1:16–1:17
- Total time: ~4 minutes
Step-by-Step
Preheat:
Rinse the press with hot water to warm it up. Discard the water.
Add Coffee & Water:
Add 30 g of coarse-ground coffee. Start your timer and pour 500 g of hot water, saturating all grounds. Give a gentle stir to make sure everything is wet.
Steep:
Place the lid on, but don’t plunge yet. Let the coffee steep for 4 minutes.
Break the Crust (Optional but Helpful):
At 4 minutes, gently stir the top “crust” of floating grounds. Many will sink. This step can improve clarity of flavor.
Skim & Plunge:
Skim off any remaining foam or grounds at the top with a spoon if you like a cleaner cup. Then slowly press the plunger down with steady pressure.
Pour Immediately:
Don’t let the coffee sit in the press; it will keep extracting and get bitter. Transfer it to cups or a separate carafe.
Tasting Notes to Look For
French press accentuates body and mouthfeel. With a medium roast from Brazil or Guatemala, expect:
- Milk or dark chocolate
- Roasted nuts
- Caramel sweetness
- Lower acidity, smooth finish
If your French press tastes muddy or gritty, try a coarser grind and be gentler with your plunge.
Espresso & Moka Pot: Intensity in Small Packages
Espresso is concentrated coffee brewed under high pressure, usually with 9 bars of pressure and a very fine grind. Moka pot, often called “stovetop espresso,” isn’t true espresso (it uses pressure from steam but less than 2 bars), yet it creates a bold, intense cup beloved in many homes.
Espresso at Home (High-Level Overview)
Dialing in espresso is its own art, but here are basic anchors:
- Dose: 18–20 g of coffee (double shot)
- Yield: 36–40 g espresso (1:2-ish ratio)
- Time: 25–30 seconds from pump start
- Grind: Very fine, almost like powder but not clumpy to the point of choking the machine
- If the shot runs too fast and tastes sour/thin: finer grind or more coffee.
- If it runs too slow and tastes harsh/bitter: coarser grind or less coffee.
- Dark chocolate and caramel in medium-dark blends
- Stone fruit or berry in lighter, single-origin espressos
- Thick body and intense aromatics
Key variables:
Expect tasting notes like:
Moka Pot Step-by-Step
Moka pots are iconic for strong, rich coffee with minimal equipment.
Recommended Gear
- Moka pot (Bialetti-style)
- Burr grinder
- Kettle
Basic Moka Pot Recipe
Water:
Preheat water in a kettle. Fill the bottom chamber of the moka pot with hot water up to the safety valve.
Grind & Dose:
Grind coffee slightly coarser than espresso but finer than drip. Fill the filter basket fully and level it off; don’t tamp hard—just a light flattening.
Assemble:
Carefully screw the top and bottom together (use a towel if the base is hot).
Brew:
Place over medium heat. Leave the lid open so you can watch the brew. When coffee begins to flow into the top chamber, it should be a steady, gentle stream, not sputtering violently.
Remove from Heat Early:
Once the flow becomes lighter and starts to hiss or sputter, remove from heat. You can cool the bottom under cold water briefly to stop extraction.
Serve:
Swirl the top chamber to mix the coffee, then pour. You can drink straight or cut with hot water or milk.
Tasting Notes to Look For
Moka pot:
- Intense, roast-forward flavors
- Dark chocolate, toasted nuts
- Subtle smokiness with darker roasts
- Great base for homemade “espresso-style” drinks
Cold Brew & Iced Coffee: Clarity vs. Smoothness
Iced coffee isn’t a single thing—it can be brewed hot and chilled, or brewed cold from the start. The method you choose dramatically changes the flavor.
Cold Brew: Slow, Smooth, Low-Acid
Cold brew is made by steeping coarse-ground coffee in cold water for many hours, producing a smooth, chocolatey concentrate.
Basic Cold Brew Recipe
- Coffee: 100 g (coarse grind)
- Water: 1 liter cold, filtered water
- Ratio: 1:10 (for concentrate; dilute 1:1 to serve)
- Time: 12–18 hours in the fridge
- Combine coffee and water in a jar or cold brew maker.
- Stir to ensure all grounds are wet.
- Cover and refrigerate for 12–18 hours.
- Strain through a fine filter or paper filter.
- To serve, mix 1 part concentrate to 1 part water or milk over ice, then adjust strength to taste.
- Low perceived acidity
- Chocolate, caramel, gentle nuttiness
- Very smooth, almost dessert-like if mixed with milk
Tasting notes:
Iced Pour-Over: Bright & Refreshing
If you want iced coffee that keeps the sparkle and acidity of hot coffee, use a Japanese-style iced pour-over.
Basic Iced Pour-Over Recipe (1 Cup)
- Coffee: 20 g (medium grind)
- Ice in Carafe: 120 g
- Hot Water: 180 g at ~200°F
- Total water (hot + melted ice): ~300 g → ~1:15 ratio
- Add ice to your carafe.
- Place dripper and rinsed filter on top.
- Add ground coffee, level the bed.
- Bloom with ~40 g water for 30–45 seconds.
- Slowly pour the remaining hot water in pulses until you reach 180 g total.
- Swirl the carafe to melt residual ice and cool quickly.
- Serve over fresh ice.
- Brighter, fruitier, more aromatic than cold brew
- Preserves origin character (perfect for Ethiopian, Kenyan coffees)
- Crisp, refreshing finish
Tasting notes:
Essential Equipment: Where to Invest First
You don’t need a café’s worth of gear to brew great coffee at home. A few smart investments go a long way.
Burr Grinder (Top Priority)
A consistent grind is more important than almost any other piece of equipment. Look for: - Conical burr grinder - Adjustable grind settings (from espresso-fine to French press-coarse) - Well-reviewed brands (Baratza, Fellow, Timemore, etc.)
Scale
A small digital scale unlocks repeatability. Once you dial in a recipe, you can actually recreate it.
Kettle
- Gooseneck kettle if you’re into pour-over (precise flow control) - Electric kettle with temperature control is a bonus, not a must
Brewer of Choice
Choose based on your style: - French press for rich and simple - V60/Kalita for clarity and ritual - Aeropress for flexibility and travel - Moka pot for stovetop intensity
Filters & Cleaning Tools
Clean gear makes better coffee. Use gentle, coffee-specific cleaners occasionally for oils and residue, and rinse your equipment thoroughly after each use.
Dialing In: How to Taste and Improve Your Coffee
Tasting coffee with intention turns everyday brewing into an ongoing craft. You don’t need professional training—just curiosity and a willingness to pay attention.
When you sip, ask three questions:
How’s the body?
Thin and watery, medium, or thick and syrupy?
How’s the balance?
Does it lean sour (under-extracted), bitter (over-extracted), or feel comfortably balanced?
What flavors stand out?
Fruit, chocolate, nuts, florals, spice, something else?
Common adjustments:
- Too sour/thin:
- Use a finer grind
- Increase brew time slightly
- Use a bit more coffee
- Too bitter/harsh:
- Use a coarser grind
- Shorten brew time slightly
- Use a bit less coffee
Keep simple notes: bean, roast level, method, ratio, grind setting, and a few words about taste. Over time, you’ll see patterns and understand your own preferences more clearly.
Conclusion
Every brewing method is a different lens on the same bean. Pour-over lets you see every detail; French press wraps it in a cozy sweater; espresso turns it into a bold statement; cold brew slows everything down into a smooth, easy-sipping experience. When you choose your beans thoughtfully, control your grind and water, and pay attention to how each cup tastes, you’re not just making coffee—you’re building a daily ritual that reflects you.
Experiment, take notes, and don’t be afraid of “bad” cups; they’re just steps toward the brews you’ll fall in love with. At RoastEden, we’re here for that whole journey—every method, every adjustment, every “oh wow” sip.
Sources
- [National Coffee Association – How to Brew Coffee](https://www.ncausa.org/About-Coffee/How-to-Brew-Coffee) - Practical guidance on brewing fundamentals, including water, grind size, and methods
- [Specialty Coffee Association – Brewing Handbook (Overview)](https://sca.coffee/research/protocols-best-practices) - Industry-standard protocols and best practices for coffee brewing and extraction
- [Perfect Daily Grind – A Guide to Coffee Brewing Methods](https://perfectdailygrind.com/2020/03/the-ultimate-beginners-guide-to-coffee-brewing-methods/) - Detailed comparisons of common brew methods and their flavor profiles
- [James Hoffmann – The Ultimate French Press Technique](https://www.youtube.com/watch?v=st571DYYTR8) - Widely referenced method and rationale for optimizing French press brewing
- [Counter Culture Coffee – Brewing Guides](https://counterculturecoffee.com/learn/brewing-guides) - Step-by-step recipes and equipment recommendations for multiple brew methods
Key Takeaway
The most important thing to remember from this article is that this information can change how you think about Brewing Methods.