Espresso is the heartbeat of modern coffee culture—tiny, intense, and endlessly expressive. Whether you’re pulling your first shot or fine‑tuning your fiftieth, understanding the craft behind espresso transforms every cup from “just coffee” into a ritual. In this guide, we’ll walk through espresso culture, bean selection, brewing technique, and tasting—step by step—so you can build a café‑worthy routine in your own kitchen.
Espresso in Coffee Culture: More Than Just a Strong Coffee
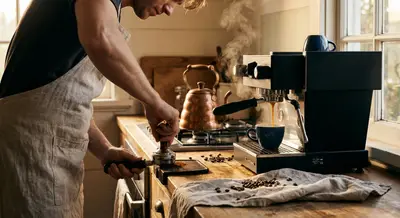
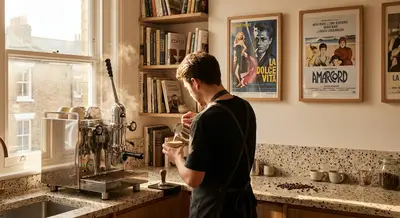
Espresso isn’t just a brewing method; it’s a social language. In Italy, it’s a quick pause at the bar—standing, chatting, and sipping in under two minutes. In Australia and New Zealand, it’s the base for flat whites and long blacks. In the U.S. and beyond, espresso powers lattes, cappuccinos, cortados, macchiatos, and the daily work grind.
What sets espresso apart is its concentration and ritual. A good shot encapsulates aroma, sweetness, acidity, and bitterness in just 20–40 seconds of extraction. For many home baristas, espresso becomes a hobby you “tinker” with—adjusting grind, dose, and time like a musical instrument until it plays the flavor you want. The more you dial in, the more your palate changes, and suddenly that “bitter” espresso becomes complex, layered, and surprisingly sweet.
It also shapes how we explore coffee origins. Espresso highlights differences between regions—fruit‑forward Ethiopians, chocolatey Brazils, nutty Central Americans, or deep, smoky darker roasts. Once you see espresso as a small window into a whole world of flavor, every new bag of beans feels like a new story to taste.
Choosing the Right Beans: Roast, Origin, and Freshness
Great espresso starts with great beans. No machine can save a bad bag of coffee. When you’re choosing beans for espresso, focus on three main factors: roast level, origin/blend, and freshness.
Roast level
- Light roast: Brighter, more acidic, often fruity or floral. Can make gorgeous, complex espresso but is less forgiving and often tastes very sharp if your technique isn’t dialed in.
- Medium roast: A sweet spot for many home baristas—balance of sweetness, body, and brightness. Excellent for straight espresso and milk drinks.
- Dark roast: Lower acidity, more bitterness, smoky or chocolatey notes. What many people think of as “classic” espresso. Easier to extract but can taste ashy if overdone.
Single origin vs. blend
- Single origin: Beans from one country/region or even a single farm. Often more distinctive: berries, citrus, florals, or specific nutty/chocolate notes. Great for sipping espresso straight.
- Blend: Roasters combine beans to balance sweetness, body, and acidity—designed to be consistent and often ideal for milk drinks.
If you’re just getting started, a medium or medium‑dark espresso blend is a safe, delicious choice. Once you’re comfortable, experiment with single origins to explore what your palate prefers.
Freshness and storage
- Look for a roast date, not just a “best by” date.
- Espresso often tastes best 4–14 days after roasting, and can remain excellent for up to 4–6 weeks if stored properly.
- Store beans in an airtight, opaque container at room temperature—no fridge, no freezer opening and closing (condensation is the enemy).
- Grind just before brewing. Pre‑ground coffee stales quickly and makes it much harder to pull a balanced shot.
Essential Gear: Building Your Home Espresso Setup
You don’t need a café‑grade budget, but some pieces of equipment make a huge difference in consistency and flavor.
1. Espresso machine
Look for:
- Stable temperature and pressure (PID controllers are a plus).
- At least a 58 mm portafilter on many mid‑ to high‑end machines (consistency and compatibility with accessories).
- A steam wand if you love cappuccinos and lattes.
Common types:
- Entry‑level single boiler/thermoblock: Budget‑friendly, good starting point. Can pull solid shots with good technique.
- Heat exchanger (HX): Better temperature stability, can brew espresso and steam milk simultaneously.
- Dual boiler: One boiler for espresso, one for steam. Most consistent and flexible, but more expensive.
2. Grinder (arguably more important than the machine)
For espresso, you need:
- Stepless or very fine stepped adjustment to control grind precisely.
- Burr grinder, not blade. Burrs produce uniform particle size, which is crucial for even extraction.
Look for an espresso‑capable grinder (manual or electric) with micro‑adjustments. If you must choose between upgrading your machine or your grinder, upgrading the grinder often yields a bigger jump in espresso quality.
3. Small but mighty accessories
- Tamper: Fits snugly in your portafilter (often 58 mm). Aim for even, level tamping.
- Scale (0.1 g accuracy): For consistent dosing and yield.
- Timer: Many scales include this; helps you control shot time.
- WDT tool (Weiss Distribution Technique): Thin needles to break clumps and evenly distribute grounds.
- Milk pitcher: For steaming milk if you like lattes/cappuccinos.
- Cleaning tools: Group brush, backflush detergent, microfiber cloths.
These small tools are what separate “randomly decent” shots from “reliably good” espresso.
Step‑by‑Step: Pulling a Classic Espresso Shot
Here’s a straightforward, repeatable workflow to dial in a standard double espresso. Once you master this, you can tweak based on your taste.
Goal recipe (a good starting point)
- Dose: 18 g of coffee in the portafilter
- Yield: 36 g of liquid espresso in the cup (a 1:2 ratio)
- Time: 25–30 seconds from the first drip
1. Warm up and prep
- Turn on your machine and let it warm up for at least 15–30 minutes for stable temperature.
- Run a blank shot (no portafilter) to heat the group head.
- Pre‑warm your cup with hot water or a quick rinse.
2. Dose and distribute
- Grind 18 g of beans into your portafilter. Use a scale until you can eyeball it accurately.
- Gently tap the portafilter to settle grounds, then use a WDT tool or a distribution tool to even them out. This helps prevent channeling (water finding an easy path and over‑extracting part of the puck).
3. Tamp
- Hold the portafilter on a flat surface.
- Tamp with firm, even pressure—around 15–30 lbs is fine, but consistency matters more than strength.
- Check that the surface is level. An uneven tamp leads to uneven extraction.
4. Lock in and pull the shot
- Lock the portafilter into the group head.
- Start your shot and timer at the same time.
Watch the flow:
- First drops around 5–8 seconds in. - Then a thin, steady stream, like warm honey. 4. Stop the shot when you reach 36 g yield, ideally between 25–30 seconds.
5. Evaluate and adjust
Taste and adjust one variable at a time:
- If the shot is sour, thin, and fast (e.g., 18 g in, 36 g out in 15–20 seconds):
- If the shot is bitter, harsh, and slow (e.g., 18 g in, 36 g out in 35–40+ seconds):
- If it tastes weak or too intense even when time is good, try adjusting the brew ratio:
- More yield (1:2.5) = lighter, more diluted.
- Less yield (1:1.5) = more intense, syrupy.
→ Grind finer (slows flow, increases extraction).
→ Grind coarser (speeds flow, reduces over‑extraction).
Dialing in is a loop: taste → adjust grind → taste again. Over a few days with the same beans, you’ll lock in a sweet spot.
Tasting Espresso: How to Read Your Shot Like a Pro
Tasting espresso is a skill you can train. Instead of just “good” or “bad,” try to break it down into components: aroma, sweetness, acidity, bitterness, and body.
1. Start with aroma
Before sipping, smell the crema and the cup. You might catch:
- Chocolate, nuts, caramel, toast
- Berries, stone fruit, citrus
- Florals or spice (jasmine, cardamom, etc.)
These hints often predict what you’ll taste.
2. First sip: structure, not flavor
Take a small sip, give it a second on your tongue, then swallow.
Ask yourself:
- Acidity: Bright like lemon? Gentle like apple? Or flat?
- Sweetness: Like caramel, brown sugar, ripe fruit—or barely there?
- Bitterness: Pleasant like dark chocolate, or harsh like burnt wood?
- Body: Thin like tea, medium like drip coffee, or heavy and syrupy?
3. Subsequent sips: flavor notes
On your next sips, look for:
- Chocolate/nutty: Common in Brazilian/Central American espresso blends.
- Fruity: Berries, citrus, stone fruits (often African coffees).
- Spice/earth: Baking spices, tobacco, or herbal notes (often in some Asian or dark‑roasted coffees).
Write quick notes if you’re working with a new bag. Over time, your palate will become more precise, and you’ll remember what you liked about different beans and recipes.
Milk Drinks: Texturing and Pairing with Espresso
If you love lattes, cappuccinos, or flat whites, espresso is only half the equation—the other half is milk texture.
Milk steaming basics
- Start with cold milk in a metal pitcher, filled to just below the spout.
- Purge the steam wand briefly to clear condensation.
- Position the tip just below the surface at an angle.
- Turn on steam and listen for a gentle paper‑tearing sound as air incorporates. This is the stretching phase, creating microfoam.
- Once the milk reaches about 100°F / 38°C (warm to the touch), sink the tip slightly deeper to stop adding air and start texturing, creating a smooth, glossy swirl.
- Turn off steam around 135–150°F / 57–65°C for most drinks. Hotter than that can dull sweetness and scald the milk.
- Wipe and purge the wand immediately.
Espresso + milk pairing tips
- Chocolatey/nutty espresso: Fantastic for cappuccinos and lattes—think dessert‑like.
- Fruity/bright espresso: Shines in smaller milk drinks (cortado, flat white) where espresso still stands out.
- Dark roasts: Cut through lots of milk easily; good for larger lattes and flavored drinks.
Aim for milk that looks like wet paint in the pitcher—no big bubbles, just a glossy surface. This gives you both better texture and flavor.
Equipment Recommendations by Budget
Without naming specific models, here’s how to prioritize your spending.
Budget‑conscious starter
- Entry‑level espresso machine with a pressurized or standard portafilter
- A good espresso‑capable burr grinder (manual can save money)
- Basic accessories: tamper, scale, simple WDT tool, small milk pitcher
Enthusiast level
- Machine with good temperature stability (PID, HX, or dual boiler)
- Dedicated electric espresso grinder with stepless adjustment
- Distribution tools, higher‑quality tamper, better pitcher, shot mirror, cleaning kit
Upgrade priorities
Grinder
Temperature‑stable machine
Workflow accessories (WDT, distribution, precision baskets)
4. Aesthetics and convenience features (pressure profiling, programmable shots, etc.)
Whatever your budget, technique and consistency will always matter more than having the most expensive machine on the block.
Conclusion
Espresso is part science, part craft, and part daily ritual. When you choose fresh, well‑roasted beans, use a capable grinder, and follow a consistent brewing routine, your home shots can rival your favorite café. From understanding coffee culture to recognizing tasting notes and mastering milk, every step deepens your appreciation for what’s in that tiny cup.
Treat each new bag of beans like a small adventure: dial it in, taste thoughtfully, and adjust with intention. Over time, you’ll go from chasing “anything drinkable” to crafting espresso that genuinely reflects your preferences—rich, nuanced, and uniquely yours.
Sources
- [Specialty Coffee Association – Brewing and Espresso Standards](https://sca.coffee/research/coffee-standards) - Official guidelines for espresso parameters, brewing ratios, and professional standards
- [Counter Culture Coffee – Espresso Basics](https://counterculturecoffee.com/learn/resource/espresso) - Practical explanation of espresso theory, dialing in, and troubleshooting for home and professional baristas
- [Blue Bottle Coffee – Beginner’s Guide to Espresso](https://bluebottlecoffee.com/us/eng/brew-guides/espresso) - Step‑by‑step home espresso guide with sample recipes and technique tips
- [Stumptown Coffee – Choosing the Right Coffee](https://www.stumptowncoffee.com/blogs/guides/how-to-choose-your-coffee) - Overview of roast levels, origins, and flavor notes to help with bean selection
- [La Marzocco Home – Milk Steaming Guide](https://home.lamarzoccousa.com/milk-steaming-guide/) - Detailed instructions on steaming milk, milk chemistry, and texture for espresso‑based drinks
Key Takeaway
The most important thing to remember from this article is that this information can change how you think about Espresso Guides.