Coffee isn’t just a drink—it’s a daily ritual, a small moment of focus and comfort. The right coffee gear turns that ritual from “good enough” into “wow, I made this.” Whether you’re just getting serious about coffee or looking to refine an already dialed‑in setup, the interplay between beans, gear, and technique is where the magic really happens.
This guide walks you through essential coffee equipment, step‑by‑step brewing techniques, and how to choose beans that sing with your favorite brew method.
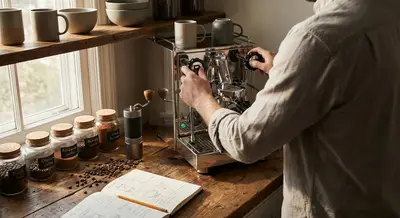
The Foundations: Gear That Matters More Than You Think
Before chasing the latest espresso machine or precision dripper, it’s worth understanding which pieces of gear have the biggest impact on flavor.
1. A quality grinder (non‑negotiable)
If you buy one “serious” piece of coffee gear, make it a burr grinder. Blade grinders chop beans unevenly, giving you a mix of dust (over‑extracted and bitter) and boulders (under‑extracted and sour). Burr grinders crush beans to a consistent size, which means:
- More predictable extraction
- Cleaner, more balanced flavors
- Better control when changing brew methods
- Burr type: Conical or flat burrs (both can be excellent)
- Grind range: Can it handle espresso‑fine and coarse for French press?
- Adjustability: Stepped (clicks) vs. stepless (infinite micro‑adjustments—great for espresso)
Look for:
2. A scale with a timer
Eyeballing scoops is a fast track to inconsistent coffee. A digital scale and basic brew ratio (e.g., 1:16 coffee to water) give you repeatable results. A built‑in timer is a bonus for pour‑overs and immersion brews.
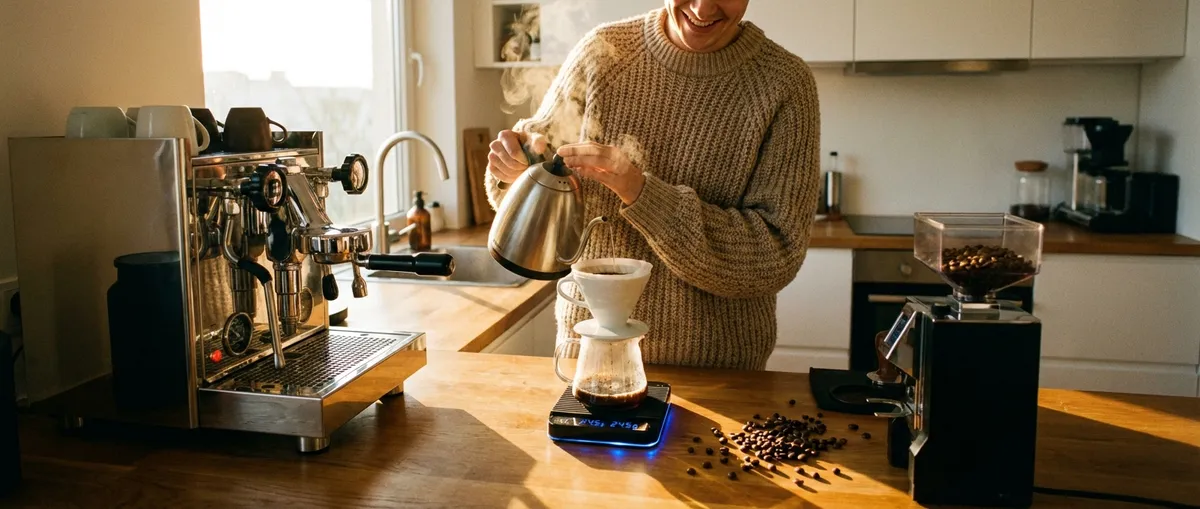
3. A kettle with good control
For manual brewing (pour‑over, AeroPress), a gooseneck kettle lets you pour slowly and precisely, which affects extraction and flavor clarity.
- Electric gooseneck kettles with temperature control are ideal
- For espresso, consistent temperature mainly comes from the machine, but for filter coffee, the kettle matters a lot
4. Freshness protection: airtight storage
Coffee is at its best within a few weeks of roasting. Light, oxygen, heat, and moisture accelerate staling.
- Use airtight containers with one‑way valves
- Store in a cool, dark place (not the fridge or freezer for daily‑use beans)
- Buy smaller amounts more frequently rather than big bags that linger
5. Brewer basics
You don’t need everything at once—choose one or two brew methods that fit your tastes and lifestyle:
- Pour‑over (Hario V60, Kalita Wave, Chemex): Clean, bright, tea‑like clarity
- French press: Heavy body, rich and cozy
- AeroPress: Versatile, travel‑friendly, from espresso‑like to smooth filter
- Espresso machine: Concentrated, café‑style drinks, more demanding and technical
- Automatic drip brewer: Convenient, can be excellent if well‑designed
Brew Methods and Step‑by‑Step Guides
Let’s break down a few core methods with practical steps you can start using today. We’ll use a common brew ratio of 1:15–1:17 (coffee:water by weight) for filter coffee.
1. Pour‑Over (V60 / Kalita / Similar)
Best for: Bright, aromatic, nuanced coffees
You’ll need:
- Burr grinder
- Pour‑over dripper + paper filter
- Kettle (ideally gooseneck)
- Scale and timer
- Fresh coffee beans
- 15–18 g coffee
- 240–270 g water at ~93–96°C (200–205°F)
- Medium‑fine grind (table salt to slightly finer)
Suggested starting recipe (1 cup):
Step‑by‑step:
Heat & prep
- Heat water to 93–96°C. - Place the filter in the dripper and rinse with hot water to remove paper taste and preheat your brewer. Discard the rinse water.
Grind & add coffee
- Grind 15–18 g of coffee medium‑fine. - Add to the filter, tap gently to level the bed.
Bloom (0:00–0:30)
- Start the timer and pour about 2–3x the weight of coffee in water (e.g., 30–40 g water for 15 g coffee). - Gently swirl the dripper to wet all grounds. Let it sit 30–45 seconds. This releases CO₂ and improves extraction.
Main pour (0:30–2:00)
- Pour slowly in circles, keeping the water level steady. - Aim to reach your total water weight (e.g., 250 g) by ~1:45–2:00.
Drawdown (2:00–3:30)
- Let the water fully drain. - Total brew time (start to finish) should be around 2:30–3:30. - If it’s too fast and tastes sour/thin, grind finer next time. If it’s slow and tastes bitter/muddy, grind coarser.
Tasting notes to expect:
- With a light roast, expect citrus, floral, berry, or tea‑like notes
- With a medium roast, more caramel, chocolate, and nutty profiles
- Body is typically lighter, but clarity and aroma are emphasized
2. French Press
Best for: Rich, full‑bodied, comforting cups
You’ll need:
- French press
- Burr grinder
- Kettle
- Scale and timer
- 30 g coffee
- 450–500 g water at ~93–96°C
- Coarse grind (breadcrumbs/sea salt texture)
Suggested starting recipe:
Step‑by‑step:
Preheat
- Rinse the French press with hot water to warm it, then discard.
Grind & add coffee
- Add 30 g of coarse‑ground coffee to the carafe.
Add water & bloom (0:00–0:30)
- Start timer and pour about half your water (225–250 g). - Stir gently to saturate grounds, let sit 30 seconds.
Fill & steep (0:30–4:00)
- Add the remaining water (to 450–500 g total). - Place the lid on with the plunger pulled up. - Let steep until 4 minutes total.
Break crust & skim (4:00–4:30)
- Gently push the grounds floating on top and give a light stir. - Skim off the surface foam and floating bits with a spoon for a cleaner cup (optional but effective).
Press & pour (4:30–5:00)
- Press the plunger down slowly and steadily. - Serve immediately—don’t let coffee sit in contact with the grounds, or it will over‑extract and become bitter.
Tasting notes to expect:
- Thicker, heavier mouthfeel
- More oils and solids, with pronounced chocolate, nutty, and roasty flavors
- Slight sediment is normal, adding to body
3. AeroPress (Classic Method)
Best for: Versatile brewing; travel and quick, clean cups
You’ll need:
- AeroPress + paper filter
- Burr grinder
- Kettle
- Scale and timer
- 15–16 g coffee
- 220–230 g water at 85–92°C (185–198°F)
- Medium to medium‑fine grind
Suggested starting recipe (concentrated cup):
Step‑by‑step (standard, non‑inverted):
Prep
- Place filter in the cap and rinse with hot water. - Assemble AeroPress on a sturdy mug.
Add coffee & start
- Add 15–16 g ground coffee to the AeroPress. - Start timer and pour 50–60 g of water, saturating all grounds. Stir gently.
Fill & steep (0:20–1:00)
- Add remaining water to ~220–230 g total. - Insert plunger slightly to create a seal (prevents dripping). - Let steep until around the 1:00–1:15 mark.
Press (1:15–2:00)
- Press down slowly; total press time about 30–45 seconds. - Stop when you hear a hiss.
Adjust strength
- Taste. If it’s too intense, top with a bit of hot water (“Americano” style). - If too weak, next time grind finer or use a bit more coffee.
Tasting notes to expect:
- Very clean, low bitterness when dialed in
- Can highlight sweetness and delicate notes with lighter roasts
- With darker roasts, expect chocolate and caramel with less harshness than drip
Espresso at Home: What to Know Before You Dive In
Espresso is where coffee gear gets serious. It’s a concentrated, high‑pressure extraction that demands consistency and precision—but the payoff can be phenomenal.
Key gear considerations:
Espresso machine types
- Single‑boiler: More affordable, but you alternate between brewing and steaming. - Heat‑exchange (HX): Brew and steam simultaneously; more stable for frequent use. - Dual‑boiler: Separate boilers for brew and steam, excellent temperature stability, usually higher‑end. - Manual lever: Hands‑on, beautiful, more of a craft experience.
Espresso‑capable grinder
Espresso needs very fine, precisely adjustable grinding. This is where a stepless grinder shines. Without a good grinder, even the best machine will underperform.
Basic espresso “starting point”:
- Dose: 18 g coffee (in a typical double basket)
- Yield: 36–40 g espresso in the cup
- Time: 25–30 seconds from pump start
- Temperature: ~93°C (200°F), depending on roast
- Grind: Fine – similar to table salt but slightly finer
Step‑by‑step overview:
Purge & warm up
- Let machine fully heat (often 20–30 minutes). - Run a quick water flush through the group head to stabilize temperature.
Grind & distribute
- Grind 18 g fresh coffee into your portafilter. - Evenly distribute grounds (use a distribution tool or a simple finger swipe) to avoid channeling.
Tamp
- Tamp firmly and level with consistent pressure. - The goal is a flat, uniform puck without cracks.
Pull the shot
- Lock in the portafilter and start the shot. - Aim for 36–40 g yield in 25–30 seconds. - If it runs too fast, grind finer. If it chokes or is painfully slow, grind coarser.
Taste & adjust
- Sour and sharp? Likely under‑extracted: grind finer or increase brew time slightly. - Bitter and dry? Over‑extracted: grind coarser or reduce shot time/yield.
Tasting notes to expect:
- Correctly pulled espresso is intense but balanced:
- Sweetness (caramel, chocolate, ripe fruit)
- Integrated acidity (like fresh fruit, not vinegar)
- Lingering finish without harsh bitterness
Choosing the Right Beans for Your Gear and Taste
Gear and technique matter, but beans are the soul of your coffee. Matching your bean choice to your brew method and preferences unlocks the best from your setup.
Roast levels and how they affect flavor
- Light roast
- Highlights origin character: fruit, floral, citrus, berry, tea‑like notes
- Higher perceived acidity, lighter body
- Great for pour‑over, AeroPress, and modern espresso styles
- Medium roast
- Balanced acidity and sweetness
- Caramel, chocolate, nuts, some fruit notes
- Versatile for most brew methods, including drip and espresso
- Dark roast
- Dominated by roast flavors: smoke, dark chocolate, toasted, sometimes bitter
- Heavier body, lower acidity
- Works well for French press or classic, bold espresso styles
Whole bean vs. pre‑ground
- Whole bean + burr grinder at home
- Best flavor and aroma
- Maximum control for every brew method
- Pre‑ground
- Convenience, but faster staling and fewer options to correct extraction
- If you must, buy from a roaster who grinds to your specific method (espresso, filter, French press) and use quickly
Origin and flavor expectations (broad generalizations)
- Ethiopia: Floral, citrus, bergamot, berry, tea‑like body
- Kenya: Bright acidity, blackcurrant, tomato, complex fruit
- Colombia: Balanced, caramel, nutty, hints of red fruit
- Brazil: Chocolate, nuts, lower acidity, crowd‑pleasing
- Sumatra/Indonesia: Earthy, spicy, syrupy, herbal tones
Pairings with gear:
- For pour‑over: Light to medium roasts from Ethiopia, Kenya, or Colombia shine
- For French press: Medium to dark roasts from Brazil or blends with chocolatey notes
- For espresso:
- Classic: Medium‑dark blends with Brazil, Colombia, maybe a bit of robusta
- Modern: Light‑medium single origins (Ethiopia, Kenya, Colombia) for brighter, fruitier shots
Dialing In: Tasting Your Coffee Like a Pro (Without Being Pretentious)
You don’t need to talk about “hints of gooseberry” to taste coffee thoughtfully. A simple framework helps you refine both technique and gear choices.
When you sip, focus on four things:
Aroma – What do you smell before tasting? Chocolate? Fruit? Nuts? Flowers?
Acidity – Is it bright and pleasant (like citrus or berries) or harsh/sharp?
Body – Light and tea‑like, or heavy and creamy?
Finish – Does a pleasant sweetness linger, or is there a bitter aftertaste?
Use that feedback loop:
- Too sour, sharp, and thin → likely under‑extracted
- Grind finer
- Brew slightly longer
- Increase water temperature (within safe range)
- Too bitter, harsh, and dry → likely over‑extracted
- Grind coarser
- Reduce brew time
- Lower water temperature a bit
Keep notes—just a few lines:
- Brew method, dose, water, grind setting, time
- Quick flavor impression: “Sweet, balanced, chocolate + orange” or “sour, thin, needs finer grind”
Over time, you’ll see patterns and understand how your gear and beans respond to small adjustments.
Recommended Starter Setups by Coffee Style
To make things practical, here are some focused gear bundles that offer great value and quality.
1. The Curious Beginner (Manual Filter Coffee)
Ideal for someone moving beyond pre‑ground and basic drip machines.
- Conical burr grinder (manual or entry‑level electric)
- V60 or Kalita Wave + filters
- Digital scale (0.1 g resolution)
- Gooseneck kettle (electric if budget allows)
- Airtight container for beans
What you get: Clear, vibrant cups; control over strength and flavor; a gentle learning curve.
2. The Comfort‑First Brewer (French Press & Drip)
For those who love rich and simple, with flexibility.
- Burr grinder
- 4–8 cup French press
- Quality automatic drip machine certified by an independent standard (e.g., SCA‑certified model)
- Basic kettle
- Airtight storage
What you get: Easy batch brewing for households, plus rich weekend French press comfort.
3. The Aspiring Barista (Espresso + Milk Drinks)
For the person who wants lattes, cappuccinos, and nuanced espresso at home.
- Entry‑ to mid‑range espresso machine with a good steam wand
- Espresso‑capable burr grinder (stepless if possible)
- 58 mm (or machine‑specific) tamper
- Milk pitcher + thermometer (or practice steaming by feel)
- Scale that fits under your cup on the drip tray
What you get: A learning curve, but the ability to make café‑quality espresso and milk drinks once dialed in.
Conclusion
Great coffee at home is less about owning every shiny gadget and more about understanding the relationship between beans, gear, and technique. A reliable grinder, a scale, a good kettle, and the right brewer for your taste will take you surprisingly far.
Start simple: pick one brew method, one dependable grinder, and a freshly roasted bag of beans that match your style. Then taste, adjust, and repeat. Over time, you’ll develop a personal coffee ritual that feels as rewarding to make as it does to drink—and your home will start to rival your favorite café.
Sources
- [Specialty Coffee Association – Home Brewing Resources](https://sca.coffee/education/pathways/brewing) - Guidelines and standards for optimal brewing, including water temperature, ratios, and techniques
- [National Coffee Association USA – Coffee Basics](https://www.ncausa.org/About-Coffee) - Overview of coffee origins, roasting, and storage best practices
- [Harvard T.H. Chan School of Public Health – Coffee and Health](https://www.hsph.harvard.edu/nutritionsource/food-features/coffee/) - Evidence-based insights on coffee consumption and its health implications
- [Serious Eats – How to Brew Coffee](https://www.seriouseats.com/how-to-brew-coffee) - Practical, tested advice on grinding, ratios, and multiple brew methods
- [Blue Bottle Coffee – Coffee Brew Guides](https://bluebottlecoffee.com/preparation-guides) - Step-by-step recipes and techniques for pour-over, French press, AeroPress, and more
Key Takeaway
The most important thing to remember from this article is that this information can change how you think about Coffee Gear.